


Replacing a fuse
Fuse box
There are two fuse boxes, one below the dashboard and one under the bonnet.
Fuses under the dashboard
To access the fuses below the dashboard, pull back the access cover, undo the screws a quarter turn and tilt the whole unit.
Replacing a fuse
Before replacing a fuse, it is essential to find the cause of the incident and to rectify it. The fuse identification numbers are indicated inside the fuse box.
Replace a blown fuse with one of the same rating (the same colour)
Use the special pliers A stowed on the cover close to the fuseboxes, this includes a compartment for replacement fuses.
Good

Faulty

Tool A

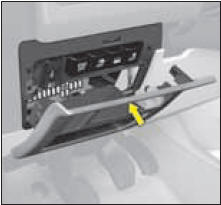
Access to the first fusebox under the dashboard

Fuses under the dashboard
Your vehicle’s electrical system is designed to operate with standard or optional equipment. Before installing other electrical equipment or accessories in your vehicle, contact a CITROËN dealer. CITROËN will not accept responsability for the cost incurred in repairing your vehicle or for rectifying the malfunctions resulting from the installation of accessories not supplied and not recommended by CITROËN and not installed in accordance with its instructions, in particular when the consumption of all of the additional equipment connected exceeds 10 milliamperes.
See also:
Starting
Manual gearbox
Ensure that the gear lever is in the neutral position.
Do not touch the accelerator.
For Diesel engines: Turn the key to the drive position. Wait for the preheater
warning lamp to ...
Trip distance recorder
System which measures a distance
travelled during a day or other period
since it was reset to zero by the driver.
With the ignition on, press the button
until zeros appear. ...
From outside
After unlocking the vehicle using the
remote control or the key, pull the
door handle. ...