


Headlamps
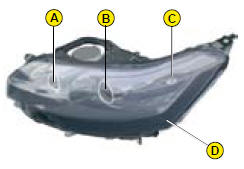
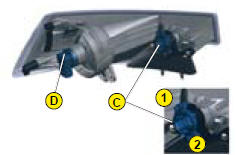
Front headlamp unit with Xenon bulbs (D1S)
Bulbs:
A S idelamp: W5W
B Dual-function Xenon lamp (dipped/main): D1S
C A ngular lighting: HP19
D Daytime-running lamp: HP24
For the maintenance of the front headlamp unit and the changing of HP19, D1S and
HP24 bulbs, contact a CITROËN dealer.
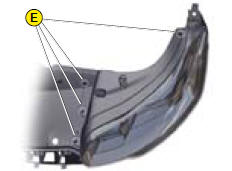
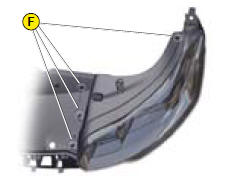
Sidelamp
1 Lift up the pegs E to remove the cover on the headlamp.
2 Remove the protective cap F.
3 Pull the bulb holder to remove it.
4 Replace the bulb and replace the bulb holder.
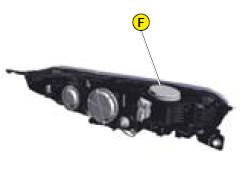
5 Replace the protective cap F.
6 Replace the cover and fix it in place using the pegs E.
Front headlamps fitted with Xenon bulbs: Because of risks of electrocution,
we advise you to contact a CITROËN dealer if there is any problem.
You are advised to change the D1S bulbs at the same time, if one of them has failed.
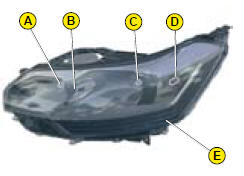
HEADLAMP UNIT
Bulbs:
A M ain beam: H1
B S idelamp: W5W
C Dipped beam: H7
D Bend lighting: H7
E Daytime-running lamp: HP24 For the maintenance of the front headlamp unit and
the changing of HP24 bulbs, contact a CITROËN dealer.
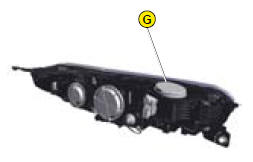
Main beam
1 Lift up the pegs F to remove the cover on the headlamp.
2 Remove the protective cap G.
3 Disengage the retaining spring.
4 Remove the bulb and replace it, paying attention to the direction of fitting.
5 Replace the retaining spring.
6 Replace the protective cap G.
7 Replace the cover and fix it in place using the pegs F.
Sidelamp
1 Lift up the pegs F to remove the cover on the headlamp.
2 Remove the protective cap G.
3 Pull the bulb holder to remove it.
4 Replace the bulb and replace the bulb holder.
5 Replace the protective cap G.
6 Replace the cover and fix it in place using the pegs F.
Halogen bulbs must not be changed until they have been off for a few minutes
(risk of serious burns).
Do not touch the bulb directly with your fingers, use a lint-free cloth.
It is essential that only anti-U.V. type bulbs are used in order not to damage the
headlamp.

Dipped beam
1 Lift up the pegs F to remove the cover on the headlamp.
2 Remove the protective cap H.
3 Disconnect the connector by pressing it between the thumb and index finger.
4 Free the bulb from its two metal clamps.
5 Take out the bulb.
6 Replace the bulb, exerting a slight axial force.
7 Reconnect the connector, until it is all the way in.
8 Replace the protective cap H.
9 Replace the cover and fix it in place using the pegs F.
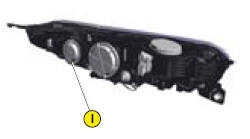
Bend lighting
1 Lift up the pegs F to remove the cover on the headlamp.
2 Remove the protective cap I.
3 Disconnect the connector by pressing it between the thumb and index finger.
4 Free the bulb from its two metal clamps.
5 Take out the bulb.
6 Replace the bulb, exerting a slight axial force.
7 Reconnect the connector, until it is all the way in.
8 Replace the protective cap I.
9 Replace the cover and fix it in place using the pegs F.
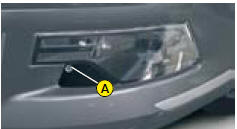
Front direction indicator
1 Remove the fixing screw of cover A using a torx tool, tip the cover over and
remove.
2 Remove the fixing screw of lamp B using a torx tool and pull the headlamp unit
to remove it from the bumper.
3 Detach the bulb C by pressing on bars 1 and 2.
4 Disconnect the connector (pull whilst pressing on the grey tongue using a flat
screwdriver).
5 Replace the bulb.
6 Connect the connector (push the grey tongue in well).
7 Replace the headlamp unit in the bumper.
8 Screw the headlamp unit in.
9 Position the cover using its guides and screw in.
Bulbs: HP24W

Front foglamp
1 Remove the fixing screw of cover A using a torx tool, tip the cover over and
remove.
2 Remove the fixing screw of lamp B using a torx tool and pull the headlamp unit
to remove it from the bumper.
3 Disconnect the connector D.
4 Remove the bulb by performing a quarter of a turn.
5 Replace the bulb.
6 Connect the connector D.
7 Replace the headlamp unit in the bumper.
8 Screw the headlamp unit in.
9 Position the cover using its guides and screw in.
Bulbs: H8
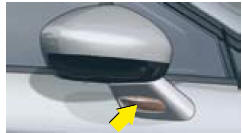
Side repeater
The side repeater is sealed.
If the bulb is faulty, replace the side repeater.
Contact a CITROËN dealer.
When replacing, be careful not to pinch the electrical cables.
See also:
Fixed centred controls steering wheel
Controls for speed limiter and cruise control
Warning lamps: lighting and direction indicators
Audio system controls
Function controls:
- Display lighting rheostat
- Voice recognition
- Air re ...
Automatic gearbox
The automatic gearbox offers:
D: operation in auto-active automatic mode, adapting automatically to your style
of driving.
M: operation in sequential mode, with manual gear changing.
D and a pr ...
Remote control
Note:
The simultaneous use of other high frequency equipment (mobile telephones, domestic
alarms, etc.) may momentarily hinder the operation of the remote control.
If there is a permanent fault, ...